Adopt an Animal Project

This is a project we do every year during the first couple of weeks of school to build a classroom community. It gives my students a chance to get to know each other and figure out which wild animal our class will adopt for the year. We usually focus on the animals at our local zoo, but the World Wildlife Fund (WWF) has a huge list of animals to choose from for this activity! You can check out their HUGE list of animals here!

We always choose an animal that comes with a plush version of it. We keep the animal, certificate, and information sheet in our classroom during the school year.

We start with a list of 5-6 animals to choose from for the animal our classroom will adopt for the year. You can choose ANY of the animals that are listed! We try to choose a variety of animals from different areas of the planet.

Once you have your list of animals each student needs to choose their favorite animal from the list. This animal will be their focus for the different projects in this pack. This pack includes a persuasive writing piece, an informational writing piece, an informational poster, and an informational bookmark activity. Click here to check out this pack in my tpt store!

Students start with a persuasive essay with the reasons why we should adopt this animal for our classroom. They will need to do some research on their animal and write 9 detailed facts about their animal on the chart that is included.

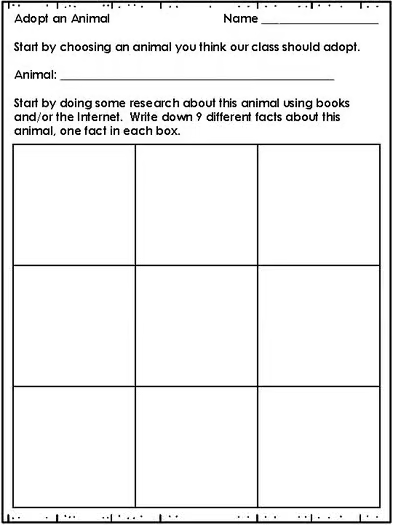
Once they have their 9 facts they will use these facts to write some sentences about their animal. These sentences and facts will help them as they progress onto their persuasive essay assignment.

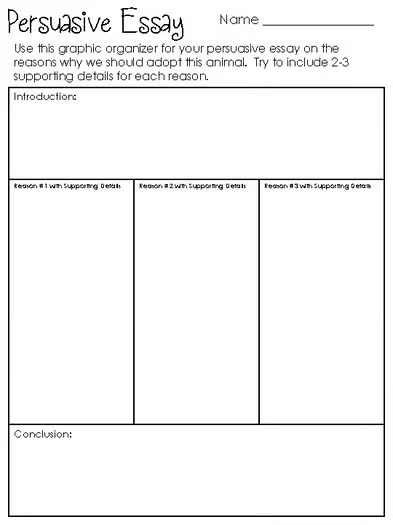
We type our persuasive essays. They are five paragraphs long with an introduction, one body paragraph per reason, and a conclusion. Students can add pictures to their essay if they do this digitally.

Next students create an informational poster about their animal. This gives them a chance to get creative! We do these posters by hand on the poster layout included in the file. I usually model one on one of the animals. I typically choose the animal that most people didn’t choose.

There are some other activities included in the pack as well. Students can make informational bookmarks and puzzles for their animal.

The last thing we do is a poster about each animal. Students work in groups of 2-4 people, so popular animals may have multiple groups! They design the poster so they can use it in a presentation to the class about why their animal should be adopted.

After the presentations, we vote as a class to see which animal we will adopt. We then adopt that animal. I usually pay the $60 adoption fee, but it could be paid by your PTO/PTA or with student donations.

Once we get our plush animal and information, we write informational reports about the animal we adopted! I usually buy a few books about this animal to have in our classroom.

We put up a bulletin board display of a collection of our work! I am always excited to see which animal we adopt each year!

Teaching Area & Perimeter with Picture Books – FREEBIE Pack Included!

Understanding the concepts of area and perimeter can be tough for students. Pairing this issue with picture books is a great way to help students get a real visual about what measuring area and perimeter really mean. In my classroom, we use a few different picture books while we work on these concepts. You can buy the books or find read alouds of them on youtube!

One of the books we read is Spaghetti and Meatballs for All! by Marilyn Burns. This project gets kids cutting out tables for the dinner a family is hosting to fit different amounts of people. The table sizes and numbers change over the course of the story.

There are three pages of worksheets to get through in this pack! The kids really get to see how to find the area and perimeter of each table size as they progress through the book!

Click here for a link to purchase this tpt pack!

If you want a copy of the book, click here to find it on Amazon!

It is a book we read every year in our intermediate classroom!

Another fun picture book to use when teaching area and perimeter is Chickens on the Move by Pam Pollack and Meg Belviso. This one has students building different sizes of chicken coops throughout the course of the story!

This book is a little tougher to find a hard copy of, but a read aloud version of the book can be found on youtube.

Click here to check out this pack in my tpt store!

The kids need to build the different sizes of chicken coops using the squares that are provided. I copy the squares on a different color of paper!

If you want to focus in on finding perimeter, then the book Racing Around by Stuart J. Murphy may be a great one for you to use!

Click here to grab this pack in my tpt shop!

It is FREE!

This illustrations in the book really help kids see the way we measure the sides of different locations to find the perimeter.

The locations in the book are not all rectangles, which is an added challenge for students.

If you want to focus in on finding area, then the book Bigger, Better, Best by Stuart J. Murphy may be a great one for you to use!

This book focuses in on figuring out the different areas of windows and rooms in a house.

Click here to see this pack in my shop!

You can grab a copy of this book on Amazon if you are interested in having a hard copy of it!

Collecting a larger set of math picture books is something I work on each year!

Once we have worked through the concepts of area and perimeter, we move on to some fun math projects that focus on area and perimeter.

This alligator challenge has students figure out the pen sizes for alligators arriving to the location!

Click here to see this pack!

Who doesn’t love team projects…with toilet paper???

This pack uses rolls of toilet paper to get team of students to try to make the largest area and longest perimeter! Grab a roll of toilet paper for each group and you are all set! Click here to see this pack!

This last project pack is another engaging team activity! All you need is a large container of animal crackers and some white bulletin board paper.

This activity looks great when students add color and objects to their animal enclosures. We glue the animal crackers onto the exhibits they create! I give each group a certain amount of animal crackers, they will get duplicates of some animals, so the exhibits need to be large enough! Click here to see this pack!

What other things do you do to teach area and perimeter in your own classroom?

Using LIVE Jumping Beans to Learn about Insects!

Bringing LIVE animals is one way to increase the excitement and engagement of the classroom experience for your students. These jumping beans are something we used to have as kids, and it is fun to bring them back to today’s kids. These jumping beans do take a little time and work to get hatched, but it is rewarding when it works! We do these labs in May and I send the jumping beans home with my students. They have usually hatched by the end of the summer. I also tell me kids they should keep the moths as a PET and not release them into the wild as they are an invasive species.

This pack will guide you through a bunch of different lessons as your students learn about insects and jumping beans! Click here to buy the pack!

We set-up a bulletin board of the vocabulary words included in the pack.

I order jumping beans from Amazon! They are inexpensive and arrive quickly.

Click here to grab 30 jumping beans from Amazon for around $20!

There are many different activities included in the pack. The kids were AMAZED by the jumping beans and how they moved.

They were able to do a lot of research on-line and we figured out the best ways to keep the larva alive as they are developing into moths.

Storing them in a cool, dry place and spritzing them with water a couple times a week seems to be the best way to get them to hatch!

There are lots of materials included in the pack I developed for my own classroom!

The pack linked above includes:

1. Jumping Bean Vocabulary – There are 15 vocabulary cards with definitions and pictures and an interactive notebook page for recording these definitions.

2. What is a Jumping Bean? – There is a pocket for recording the definition of a jumping bean and an information page. We also read the book, Not a Bean, by Claudia Guadalupe Martinez. There is also an Observe a Jumping Bean Lab (we use a real jumping bean for this observation).

3. Life Cycle of a Jumping Bean – There is information about the life cycle of the jumping bean. Students need to create their own life cycle chart for their notebook. Copy the front page on cardstock if possible.

4. Prediction/Recording Sheet – Complete a sheet making some predictions about the jumping beans and record some data about the beans you have in the classroom.

5. Science Lab for Temperature Reaction – Find out how the jumping beans react to different temperatures by completing this lab.

6. Science Lab for Water Reaction – Find out how jumping beans react to water by completing this lab.

7. Science Lab for Touch Reaction – find out how jumping beans react to being help between two fingers by completing this lab.

8. Make a Game Board – Make a game board for the jumping beans to be placed on. Record observations. A completed game board is included on a second sheet of the pack.

9. Fun Facts about Jumping Beans – Do some research using books and/or the Internet. Find 6 fun facts about jumping beans. Make a mini-poster with your findings.

Keep your students engaged at the end of the school year with LIVE animals! There are many to choose from, but my class really enjoys learning about jumping beans!